This screen will only adjust vendors that are set as a 1099 Vendor (any type other than “None”)
- Go to Accounts Payable > Vendors > Modify Existing Vendor
- Pull up the vendor that showed the alert
- Change their 1099 Type to Nonemployee or other appropriate type
- Go back to Adjust 1099 Balances and make the appropriate adjustments
- If the vendor should not be a 1099 vendor, go back to Modify Existing Vendors and switch the 1099 Type back to “None”
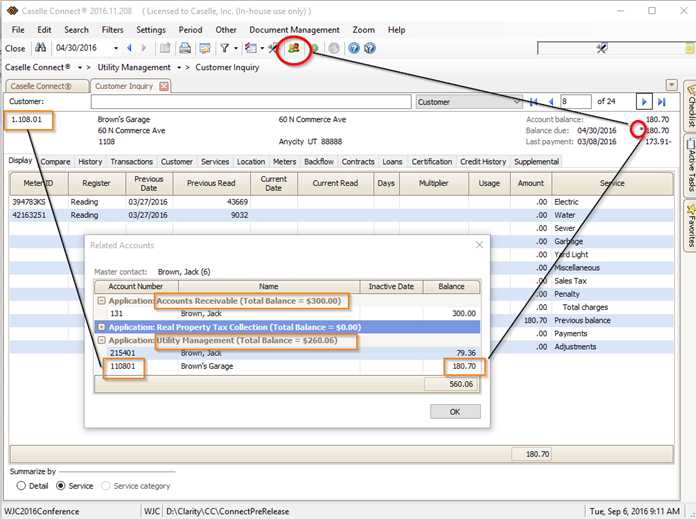 This means that the balance due for this account may not be the total balance owed since there are other accounts tied to this account. This is the Master Contacts feature within Caselle.
For example, you might have a few utility accounts and an account in AR that are tied to the same person. Click on the Related Accounts icon (which looks like two people) at the top of the Inquiry screen, to see the related account(s) associated with the one you currently are on.
- Click Checklist on the right side of your Caselle screen.
- Select the clipboard with a red check mark on the right side of the checklist.
- Select the Checklist you would like to modify.
- Create your new step by clicking the drop down next to the white piece of paper with the green plus sign icon.
- Select create a new task.
- Type in a description for the new task.
- Select the radio button next to “Run another program launch a file or URL when the task is selected.”
- Enter the web address or file location in the Target box. 9. Be sure to click OK.
This way you can click on the step in the checklist and the web page or file location will open right up for you!
To begin, you may want to review this New Report Document, which shows the features included in the new report base.
Next, try saving a test versions of a report definition of any report that uses the new report base (all of the Cash Receipting reports in Connect utilize the new report base) so you can test out some of the new features.
Some of the key features include the following:
- See the date the report was created
- Last modified and last processed
- Modify the report order for each report section
For each section, simply selecting or deselecting a checkbox allows you to do the following:
- Add a line between records
- Suppress printing of headings, details, or totals
- Suppress printing of an entire section altogether
- Add page breaks
See which columns offer the “drill-down” feature. Click on the “drill down” link to see what makes up a summary total.
We plan to incorporate the new report base into all of the Caselle reports on a staggered basis. Review the quarterly Release Notices to see which reports are now able to utilize these new features.
- Accounts Receivable > Customers > Unapplied Payments
- Use the Selection Criteria to select the Customer Number
- Beginning payment date: Date of the payment you wish to correct
- Check mark the box next to the payment you are correcting
- Click GO to “unapplied” the payment
- Now go to Customers > Apply Payments to apply the payment to the correct invoice